

Step by Step Dog Nail Trimming: A Beginner's Guide
TL;DR:
- You can trim most dogs’ nails safely at home if the dog is calm and the right tools are used. Proper technique involves small cuts, patience, and rewarding the dog to ensure a positive experience. When in doubt or facing resistance, consulting a professional groomer or vet is the best choice.
You can safely trim most dogs’ nails at home. The condition: your dog is calm enough to hold still, you have the right tools, and you’re willing to go slow. That’s genuinely it.
Here’s the short version before we get into the full process:
- Use dog-specific clippers or a grinder (never human nail clippers)
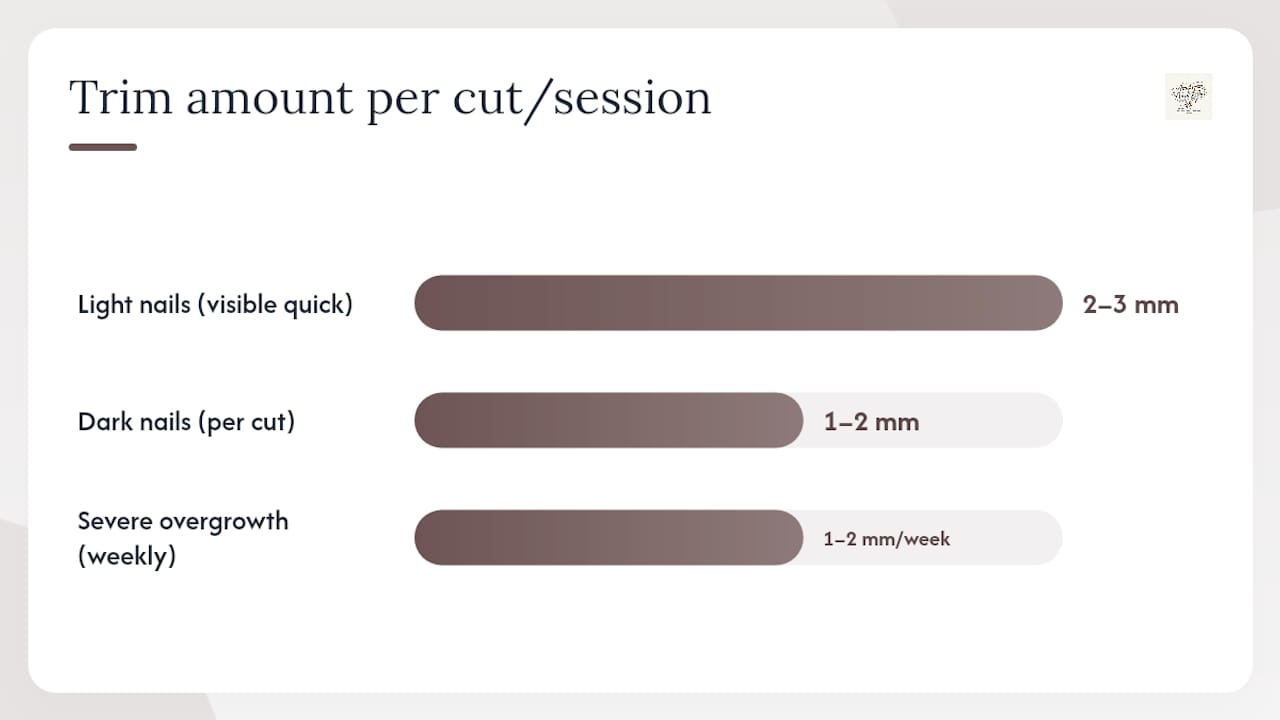
- For dark nails, remove 1–2 mm at a time. For light nails, trim 2–3 mm away from the quick.
- Keep styptic powder within reach before you start
- Stop the moment you see a grey or pink oval appear in the nail’s cross-section
- Reward your dog after every nail, not just at the end
Sources including VCA Animal Hospitals, the American Kennel Club, and PetMD all agree on the same core principle: patience and preparation prevent almost every common mistake.
Table of Contents
- What tools do you need for dog nail trimming?
- Step by step dog nail trimming: the full procedure
- How do you trim dewclaws safely?
- What should you do if you cut the quick?
- How often should you trim your dog’s nails?
- What can you do when your dog won’t cooperate?
- Key Takeaways
- The part most guides skip over
- Ready to build your grooming kit?
- FAQ
What tools do you need for dog nail trimming?
The right equipment makes the difference between a clean cut and a split nail. Here’s what to gather before your first session:
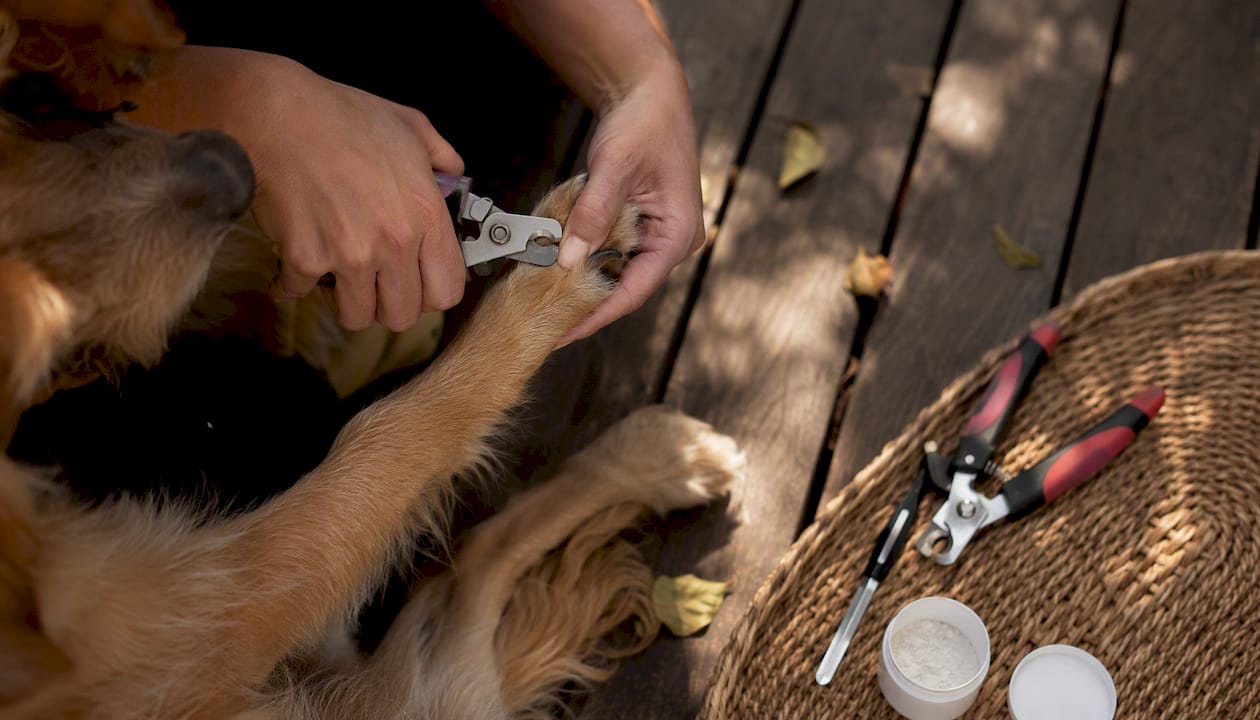
- Scissor-style or guillotine clippers: — Both work well for most dogs. Scissor clippers give you more control on thick nails; guillotine clippers suit medium-sized nails cleanly.
- High-value treats: Something your dog genuinely gets excited about. Duck breast jerky treats work well because the smell alone holds attention.
What NOT to use: Human nail clippers. They’re designed for flat, thin nails. Dog-specific clippers and grinders are built for the rounded, thicker shape of canine nails, and using the wrong tool is the most common cause of crushing or splitting, according to Purina’s grooming guidance.
Pro Tip: If your dog is noise-sensitive, start with clippers. If your dog hates the pressure of clipping but tolerates vibration, a grinder may be the better long-term tool. You don’t have to pick just one.
Step by step dog nail trimming: the full procedure
Once your dog is comfortable with the tools and handling, follow this sequence every session.
- Get to their level. Sit on the floor or use a stable table. Your dog should feel secure, not suspended.
- Extend the nail. Place your thumb on the pad and your index finger on top of the toe. Gently push the pad back to extend the nail fully.
- Position the clippers at a 45-degree angle, following the natural downward curve of the nail.
- For light nails: You can see the pink quick through the nail. Cut 2–3 mm from where the pink ends, according to VCA Animal Hospitals’ trimming guidance.
- For dark nails: Remove 1–2 mm at a time. After each cut, look at the cross-section of the nail. When you see a small grey or pinkish oval appear in the center, stop. That’s the edge of the quick.
- Trim the outer toes first, then work inward. This gives your dog time to settle into the routine before you reach the more sensitive inner toes.
- Include dewclaws if your dog has them (more on those below).
- Smooth the edge with a file or a brief pass of the grinder.
- Reward immediately after each nail, not just at the end of the paw.
Visual checkpoints for dark nails:
- White or chalky cross-section: keep going, you’re in the dead nail
- Grey or pinkish oval appearing: stop here
- Dark central dot: you’re very close to the quick, stop immediately
Pro Tip: If your dog’s nails are severely overgrown, don’t try to get them to the right length in one session. Trim 1–2 mm weekly. The quick recedes as you trim, and within a few weeks you’ll have room to cut to a healthy length without drawing blood.
How do you trim dewclaws safely?
Dewclaws are the small nails located on the inner side of the leg, above the main paw. Some dogs have them on the front legs only; some have them on all four. A few breeds have double dewclaws on the rear legs.
Because dewclaws don’t touch the ground, they don’t wear down naturally. Left untrimmed, they can curve back into the skin, which is painful and can cause infection.
- Support the dewclaw toe with your fingers before cutting. It has less structural support than the other toes.
- Use the same 45-degree angle and small-increment approach.
- Watch the curvature carefully. A dewclaw that has grown in a curve needs to be trimmed more conservatively to avoid cutting into the quick, which runs further into curved nails.
- Check dewclaws every session, even if the main nails don’t need trimming yet.
Pro Tip: Dewclaws are easy to forget because they’re out of the way. Set a separate reminder to check them at every grooming session. A deeply ingrown dewclaw requires a vet visit, not a home trim.
When to call a professional: if the dewclaw has already curved into the skin, if the nail is so long it has changed the dog’s gait, or if your dog reacts with pain when you touch that area.
What should you do if you cut the quick?
It happens to every dog owner eventually. Stay calm. A nicked quick bleeds more than it hurts, and your dog will take their cue from you.
- Apply firm pressure to the nail tip with a clean cloth or gauze for 30–60 seconds.
- Dip the nail in styptic powder or press a pinch of it directly onto the nail tip. According to VCA Animal Hospitals, styptic powder is the first-line treatment and stops bleeding quickly.
- No styptic powder? Cornstarch or flour pressed firmly against the nail tip works as a temporary clotting aid.
- Keep your dog still for a few minutes after the bleeding stops. Walking on a freshly clotted nail can reopen it.
- Reward your dog and end the session. Don’t push through the rest of the nails that day if your dog is now anxious.
When to call a vet: If bleeding doesn’t stop within 10–15 minutes of consistent pressure and styptic application, or if you notice swelling, limping, or signs of infection in the days after.
- Keep styptic powder in your grooming kit at all times
- Kwik Stop and similar products are available at most pet supply stores
- A styptic pencil works the same way and is easier to apply precisely
How often should you trim your dog’s nails?
Most dogs need nail trimming every 3–4 weeks, but that number shifts based on lifestyle. A dog that walks daily on concrete wears nails down faster than one that mostly walks on grass or carpet.
| Factor | Effect on frequency |
|---|---|
| Daily walks on pavement | Less frequent trims needed (nails wear naturally) |
| Indoor or soft-surface lifestyle | More frequent trims needed |
| Puppy or young dog | Faster nail growth, trim more often |
| Senior dog | Growth slows, but nails can become brittle |
| Dewclaws (all dogs) | Check every 3–4 weeks regardless of main nail length |
Signs a trim is overdue:
- Nails click on hard floors when your dog walks
- Nails visibly touch the ground when your dog stands
- Nails have started to curve sideways
- Your dog is shifting their weight or walking awkwardly
- Dewclaws look curved or are growing toward the skin
A consistent schedule prevents the quick from growing long, which makes every future trim easier.
What can you do when your dog won’t cooperate?
Some dogs resist nail trimming no matter how careful you are. That’s not a failure. It’s a training problem with real solutions.
Short-term strategies:
- Trim after a long walk or play session when your dog is genuinely tired
- Do one nail per session if that’s all your dog tolerates
- Try a grinder instead of clippers. Some dogs that hate the snap of clippers accept the vibration of a grinder without issue
- Use a lick mat with peanut butter or wet food to occupy your dog during trimming
Training options:
- Return to the desensitization steps from the prep section and slow down the pace
- Use positive reinforcement techniques consistently: treat immediately after each nail, not just at the end
- Add a helper who focuses entirely on keeping your dog calm and rewarded
- Consider calming chews formulated for dogs before sessions. Consult your vet before using any supplement regularly.
- Ask your vet about pheromone sprays like Adaptil, which can reduce anxiety in some dogs during grooming
Red flags that mean it’s time for a professional:
- Your dog snaps, growls, or shows aggression during nail handling
- Stress is so severe that your dog is panting, shaking, or trying to escape the room
- There’s a medical reason (arthritis, injury, anatomical issue) making handling painful
A groomer or vet tech can trim nails safely in situations where home trimming isn’t working. That’s not giving up. It’s the right call.
Key Takeaways
Safe, consistent nail trimming comes down to the right tools, small cuts, and a dog that’s been gradually prepared for the process.
| Point | Details |
|---|---|
| Use dog-specific tools only | Human clippers crush and split canine nails; use dog clippers or a grinder every time. |
| Cut 1–2 mm at a time for dark nails and 2–3 mm away from the quick for light nails. Stop when a grey or pink oval appears in the nail’s cross-section. | |
| Trim every 3–4 weeks | Most dogs need this schedule; active dogs on pavement may need less frequent trims. |
| Keep styptic powder ready | Apply it immediately if you nick the quick; cornstarch works as a backup. |
| Americanbarkbliss grooming kits | The all-in-one grooming kit includes the tools this guide recommends for a complete beginner setup. |
The part most guides skip over
Most nail trimming guides focus entirely on technique. Cut at 45 degrees, watch for the quick, use styptic powder. That’s all correct. But the part that actually determines whether home trimming works long-term is the emotional experience your dog has during those first few sessions.
A dog that associates nail trimming with calm handling and high-value treats will tolerate it for life. A dog that gets forced through a full trim while panicking will fight every session harder than the last. The technique is the easy part. The relationship is what makes it repeatable.
The stepwise approach in this guide, borrowed from AKC and VCA guidance, isn’t slow because it’s cautious. It’s slow because it works. One nail today, two tomorrow, a full paw by the end of the week. That pace builds something that rushing never can.
If your dog is already resistant, the answer isn’t a tighter grip. It’s going back to step one of desensitization and treating the whole process as a new introduction. That reset takes less time than most owners expect.
Ready to build your grooming kit?
Getting the right tools before your first session removes most of the risk. Americanbarkbliss carries the Country Living all-in-one grooming kit, a three-piece set built for home use that covers the essentials this guide recommends. It’s a practical starting point for any dog owner who wants to handle grooming at home without piecing together tools from multiple sources.

Pair it with high-value treats to keep your dog motivated through the desensitization process, and browse the full grooming supplies range at Americanbarkbliss to find what fits your dog’s size and temperament. Every product ships from within the US and is selected for quality and durability.
FAQ
How do you properly trim dog nails for beginners?
Use dog-specific clippers at a 45-degree angle and remove 1–2 mm at a time for dark nails and 2–3 mm from the quick for light nails, stopping when a grey or pink oval appears. Reward your dog after each nail and keep sessions short, especially at first.
Should you cut dog nails vertically or at an angle?
Cut at a 45-degree angle following the nail’s natural downward curve. A straight vertical cut doesn’t follow the nail’s shape and increases the risk of splitting or hitting the quick.
What part of the dog’s nail should you never cut?
Never cut into the quick, the pink blood vessel visible in light nails and identifiable as a grey or pinkish oval in dark nails. Cutting the quick causes bleeding and pain; always stop before that oval appears.
How do groomers handle dogs that won’t stay still for nail trims?
Professional groomers typically use a combination of firm but calm restraint, high-value treats, and practiced positioning. For very anxious dogs, a vet may recommend a mild sedative or anti-anxiety medication before the appointment.
Leave a comment